
Guest Post- String Bends & Ear Training - Leigh Fuge (MGR Music)
One of the biggest challenges for any aspiring player is nailing your bending pitch. It’s so easy to take the shine off your killer solo with a few badly pitched bends. Imagine if the first bend in the Stairway to Heaven solo was sharp, or picture Slash, cool as can be, leaning back outside that church in the November Rain video pouring all his emotion into a solo with badly out of tune bends. It doesn’t quite add to the guitar hero dream does it?What can we do to remedy this? Well there are 2 key elements to great string bending. Your fingers and your ears. Training these 2 things should come as a package, you need your fingers to be strong enough to make those all-important bends but you also need your ears to be listening, so you know where your pitch is heading.An exercise I think is highly beneficial for string bending and ear training is to take the notes of the A Natural Minor Scale (A B C D E F G) and play them in ascending groups of 3 from the 2nd fret of the G string (
Ex. 1
). This first part is not to get your bending strength but it’s to get the notes into your ears and the pitches of every note of the scale familiar to you. The first 2 notes of each bar are played as ¼ notes while the third note is played as a ½ note (This extra length is what you should be listening to – get that pitch in your mind).
Ex.1

Picture
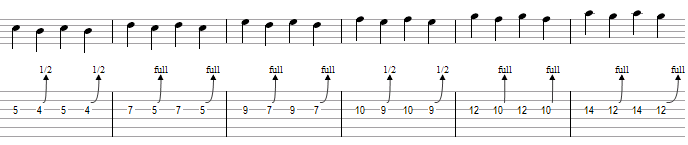
Once you’ve gotten those pitches in your ear, you can then start to work through the 3 note groupings again but bending each 3rd note in the group (
Ex. 2
). You’ll be bending the following:
4th fret from a B to a C (1/2 tone)
5th fret from a C to a D (Whole tone)
7th fret from a D to an E (Whole tone)
9th fret from an E to an F (1/2 tone)
10th fret from an F to a G (Whole tone)
12th fret from a G to an A (Whole tone)
14th fret from an A to a B (1/2 tone)
Be sure to put the focus on the pitch of the bend. You want to bend it from the note your playing to the target note in the scale. Don’t forget to support your bends with multiple fingers, especially the whole tone bends. To play these bends, play the note before you bend it, then gradually bend up to the target note. This works great with a metronome where the first 2 notes are ¼ notes and the bend is a ½ note. Having the bend as a ½ note allows you to hear the range of the bend up to the desired pitch. Practising this with a metronome at a comfortable speed will allow you to slowly increase your speed until you can hit your target quickly.
Ex.2

Picture
The big thing to watch out for here is over or under bending. You want to really get the pitch of the target note in your ear by playing it, then bend the note up to it (
Ex. 3
).This will help you hear what you’re aiming for with your bend.

Picture
Once you feel comfortable with gradually bending the note from the note you play to the target note, we can introduce the concept of pre-bends (
Ex. 4
). A pre-bend is when you bend the string to the desired pitch before picking the string. This will make the exercise more challenging as you’ll be testing your strength and muscle memory rather than your ear. Your ear will act as your guide when you play the note to tell you if you’ve hit the mark or if your sharp/flat. For this exercise, you’ll be pre-bending the note you were gradually bending before.

Picture
Once you’ve gotten to grips with playing the scale ascending with the pre-bends, we can flip this around and work backwards from the top note to the root. Play the scale in descending groups of 3 (
Ex. 5
) to get the pitches into your ear.

Picture
Now, we are going to work backwards, the first note is going to be your bend (From the middle note of each 3 group to the highest) which will then be followed by 2 picked notes (
Ex. 6
). Play the middle note first before gradually bending up to the target note.

Picture
As with playing the scale ascending order, the trick is to still use your ears to hear the target pitch. Bending gradually up to the target note will allow you to hear when you’ve hit that pitch. It will also boost your finger strength and fluidity of bending. As with the ascending version, it will also make great finger and ear training to apply pre-bends to the descending run (
Ex. 7
). You’ll be playing the pre-bent note, followed by 2 picked notes.

Picture
Finally, we will try this again in a descending fashion, but this time we’ll be playing the middle note of the grouping before we bend it. Then we will bend up to the target note and then whilst keeping the pressure on the note, release the tension back to its original state. This bend and release motion will give us the note you play, up to the target note and back again (
Ex. 8
). If you are doing this grouping with a metronome you can adjust the timing of this exercise to make it all ¼ notes. Your first beat will be picking the middle note of the grouping and bending it up to the target note, the second beat will be the release of the target note back to its original pitch, the third beat will be that original pitch note picked again and the fourth beat will be the lowest note in each grouping. You may note that beats one and two are achieved with a single pick stroke.
Picture
Whilst all these exercises run the length of the scale, you can break them up into small chunks. If you’re finding it difficult to move up or down the full range then start off with 1 or 2 bars and get those fluent, then add a third bar and slowly work up to the full scale.
About the Author
Leigh Fuge is an experienced guitar tutor and professional musician from Wales, UK. He has taught hundreds of students in both face to face and via online
.
He has a passion for sharing information and practise routines to help students develop their own voice with the instrument and achieve their full potential.